


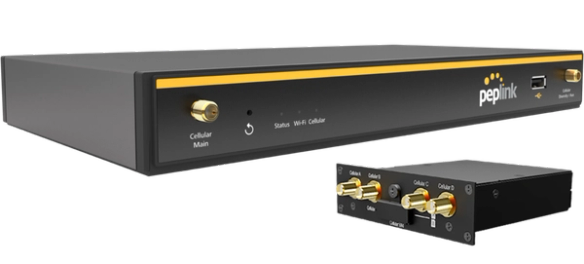
Peplink MAX BR1 Pro 5G External Antenna Guide
Why you can trust Waveform
Waveform is the leading provider of solutions for improving cellular signal and connectivity. Our team of experts has decades of combined experience in wireless communication and remains committed to providing honest, data-driven reviews and recommendations. We rigorously test every product we sell and maintain complete editorial independence. No company can pay to influence our reviews or product ratings.
Read more about Waveform
- The Best External Antennas For the Peplink MAX BR1 Pro
- Why External Antennas Are Critical for Improving Data Rates
- Installing External Antennas to the Peplink Max BR1 Pro 5G
- Step-by-Step Guide to Installing Adapters for External Antennas
- Positioning and Aiming MIMO Antennas
- Advanced Optimization
- Band Locking the Peplink MAX BR1 Pro
- Peplink MAX BR1 Pro Technical Specifications
- Other Helpful Resources
- A helpful video by Mobile Internet Resource Center
- Peplink's product page info for the MAX BR1 Pro
- Documentation
Looking to get the best possible data rates from your Peplink MAX BR1 Pro?
You’ll want to purchase and connect external MIMO antennas to the device’s four SMA ports.
In this guide, we'll:
- Recommend the best external antennas to use.
- Show where the SMA ports are located.
- Explain how to aim the antennas for best results.
The Best External Antennas For the Peplink MAX BR1 Pro
Using a MIMO antenna outside your building, pointed at the nearest tower, can help you get the fastest LTE data rates possible.
The Peplink MAX BR1 Pro has four cellular SMA ports on the back. These allow for a 4x4 MIMO antenna array to be connected to the device.
Whether or not you already have a Peplink MAX BR1 Pro 5G, which of the two different 4x4 MIMO External Antenna Kit options to use depends primarily on how much time you're willing to spend on aiming.
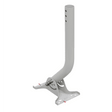
The easiest antenna choice for the MAX BR1 Pro 5G is our QuadMini Antenna Kit. With up to 5.2 dBi of omnidirectional gain and multiple mounting options, it is designed to be extremely simple to install outdoors or indoors, at home or in an RV.

QuadMini: Low-Profile Omni 4x4 MIMO Antenna
Upgrade your 5G in minutes with no aiming, and four easy mounting options.
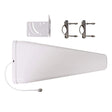
However, if you're willing to spend a little bit of time aiming, our QuadPro Antenna Kit will generally get you the fastest data speeds, thanks to its 9.1 dBi of directional gain. This is particularly important if you're on the edge of coverage, or have very weak signal.

QuadPro: High-Gain Directional 4x4 MIMO Antenna
Aim QuadPro at your nearest tower for blazing data, even at the edges of cellular coverage.
Finally, if you are planning to use the Peplink MAX in a vehicle, you will want to use the 4x4 Omniroam MIMO antenna. This is a high-performance mobile antenna suitable for use in any size and type of car, van, SUV, or RV.

Waveform OmniRoam: 7-in-1 Low-Profile Mobile Antenna (4G/5G, WiFi & GPS)
A high-gain mobile antenna suitable for all vehicle types, with three easy mounting options included
Why External Antennas Are Critical for Improving Data Rates
Most people think that external antennas primarily help you increase your data rates by increasing the signal strength. But that's not the case.
An increase in signal strength is often less important than other ways that external antennas help.
Here are the three main ways that external antennas help you increase your data rates:
-
They Improve Signal Quality
In 4G LTE and 5G networks, signal quality is measured as SINR (Signal to Interference plus Noise Ratio) or sometimes as RSRQ (Reference Signal Received Quality).
Improving signal quality has a huge impact on your data rates.
Higher data rates allow your hotspot to communicate using "higher order modulation schemes." That means they can use the same wireless spectrum to send more data per second.
However, there's one big caveat:
In order to improve your signal quality, you need to both aim and shield your outdoor antenna properly. We talk more about this in the next section.
-
They Allow You To Connect On More Bands
Routers like the Peplink MAX BR1 Pro support an LTE feature called "carrier aggregation."
Carrier aggregation allows the Peplink router to connect on multiple cellular bands simultaneously.
The more bands you're connected to, the greater the bandwidth, and the higher your data rates.
However, many of the higher frequency bands aren't able to penetrate into buildings. Using external antennas allows you to access higher frequency bands, which are often less congested and offer higher speeds than lower frequency bands.
-
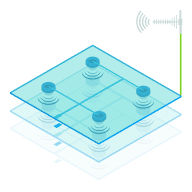
MIMO Isolation
MIMO (Multiple Input Multiple Output) technology uses signals travelling along multiple paths simultaneously, increasing both bandwidth and reliability in wireless connections.
MIMO isolation is the antenna's ability to handle several data streams at once, cleanly and without interference, leading to quicker data speeds and steadier connections
Our external antennas are specifically designed for superior MIMO isolation, and dramatically outperform standard built-in antennas found in most home devices.
This means you'll see a more reliable connection with enhanced bandwidth, ensuring smoother streaming, gaming, and browsing with minimal interruptions.
Installing External Antennas to the Peplink Max BR1 Pro 5G
Before getting started, it's always a good idea to run a couple of speed tests indoors from a device connected to your Peplink's WiFi. The results will fluctuate a little, but this is the baseline you're trying to improve.
Once you've tested your baseline internet speeds, you're ready to install external antennas.
In the next section of this guide, we'll show you how to open up your Peplink, connect adapters for external antennas.
Note that your Peplink MAX BR1 Pro has seven antenna ports:
- The two RP-SMA ports grouped on the front edge labeled Wi-Fi Antenna A and B are used for WiFi antennas. Leave these connected.
- The single SMA port on the back edge labeled GPS is for a GPS antenna. If relevant, leave this connected.
- The four SMA ports grouped on the back edge, labeled Cellular A, B, C, and D are for cellular antennas. These are the ports you'll be connecting to your MIMO external antenna(s).
Step-by-Step Guide to Installing Adapters for External Antennas
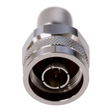
Step 1: Disconnect the standard paddle antennas that are connected to the "Cellular" antenna ports.
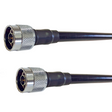
Step 2: Connect the external MIMO antennas to the newly available cellular SMA ports on your Peplink MAX BR1 Pro in the order shown below:


Note: The cable paths of the UltraFlex-Quad Cables are labeled 1 through 4 on the cable jackets to assist with matching the cable connectors on each end of the cable.
Congrats! Your Peplink Max BR1 Pro 5G is now connected to your more powerful MIMO External Antennas.
Positioning and Aiming MIMO Antennas
Correctly positioning and aiming MIMO antennas is crucial to getting the best performance to your Peplink, or indeed any other router.
We've actually compiled a detailed QuadPro and QuadMini instruction manual to accompany our own MIMO Antenna Kits, where we go into depth on the best ways to aim the antennas.
The goal is to find the best location and direction for the antenna(s) to maximize data rates to the hotspot. It can take a little patience, but can have a huge impact – it’s worth a bit of extra effort!
Once you've got your external MIMO antennas connected, you're ready to go outside with your "test-rig".
With each location and direction you try, run a couple speed tests, and make a note of the results. Here are all the locations and directions where we recommend testing your MIMO antenna:

Pro tip: Don’t just go to the highest point of the roof! While signal is generally stronger the higher you go, there’s also often more interference. We’ve found it’s often better to mount the antenna(s) on the side of the building where the structure can shield the antennas from interference.
Once you've found the position which gets you the highest data rates to the Peplink router, that's where you'll want to install the MIMO antenna. Go ahead and mount the antenna, run cables inside, connect everything up, and enjoy superior data rates!
Advanced Optimization
If you've gone through the trouble of installing and accurately aiming a MIMO Antenna Kit, you're likely already getting excellent data rates from your Peplink MAX BR1 Pro.
That said, there's always more that can be done!
Band locking is a great way to optimize data rates through an LTE router or hotspot. The idea is that you test every different frequency band being received by your device, and lock it onto the band that results in the best data rates.
The Peplink MAX BR1 Pro is one of few lines of routers that allow manual band locking in their web interface - here's a step by step guide of how to do it.
Band Locking the Peplink MAX BR1 Pro
The reason this works so well, is because different frequency bands transmit with different bandwidths.
Generally speaking, higher frequency bands (like 1900 MHz and 2100 MHz) offer more bandwidth but travel less far and penetrate building materials less well than lower frequency bands (like 700 MHz and 800 MHz).
As a result of travelling less far, higher frequency bands tend to be less “congested” - they have fewer users connected to them, and data rates are often faster.
This isn’t always the case though, sometimes a lower frequency band may have better data rates, depending on your location.
This can be quite time consuming, but often results in significant improvements to data rates.
We'll keep the steps below as simple and concise as possible! If you need a little more guidance, you can find a video about this here.
Step 1: Access the Peplink's web interface
- Use a computer to connect to your Peplink's LAN network via ethernet, and open a web browser.
- Enter "192.168.50.1" into the URL bar to log into the Peplink web interface.
- Login to the interface with your username and password - default username is "admin" and the password is "admin".
- You will be required to change the password on the first logon.
Step 2: Navigate to the cellular settings
- On the main dashboard, you will see a number of fields under "WAN Connection Status".
- Find the cellular option with a SIM card detected, and click on "Details". There's a fair amount of useful and interesting information to be found in this section of the web interface. For now, we're only interested in the band locking feature.
- Scroll down past "Cellular Status" and "WAN Connection Settings", until you see "Cellular Settings".

Step 3: Activate manual band selection on the Peplink MAX BR1 Pro
- Expand the dropdown under the active SIM card slot, and change "Band Selection" mode to "Manual".

Step 4: Lock the Peplink MAX BR1 Pro to a frequency band
- From the list of bands that appears, select only the band(s) to which you'd like to lock the Peplink router.
- In the example below we've selected all of the bands that are available, you will probably only want to select a subset of the 4G LTE and 5G bands.
- We recommend unselecting all of the available 3G bands (i.e those labeled WCDMA, HSDPA, etc.) as they are no longer supported by most modern carriers**

Once you've selected the bands you'd like to use, reboot the router for the changes to take effect.
Now, lets test each available band in your area, to determine which will result in the best data rates.
Step 5: Test and select the best tower and frequency band
- Look up your nearby towers. This can be time consuming and accuracy is often questionable - we've listed our suggestions in an article on the Best Ways to Locate Nearby Cell Towers.
- Aim your external MIMO antenna(s) at each nearby tower and band lock the Peplink MAX BR1 Pro to each band that the tower transmits.
- Run 3 to 4 speed tests on each band to find the fastest bands. Speedtest.net is a great tool for this.
- Repeat this for every tower in your area, and make notes of the speed test results you get from each band and tower combination.
Once you've identified the best tower and band combination, lock your Peplink to that band, and make sure your outdoor antenna is secured so that it doesn't move in the wind.
Peplink MAX BR1 Pro Technical Specifications
Supported 4G LTE bands
- AT&T: B2, B4, B5, B12, B14, B17, B29, B30, B66
- Verizon: B2, B4, B5, B13, B46, B48, B66
- T-Mobile: B2, B4, B5, B12, B25, B26, B41, B66, B71
- Other: B1, B3, B7, B8, B17, B18, B19, B20, B28, B32, B34, B38, B39, B40, B42
Supported 5G bands
- AT&T: n5, n77
- Verizon: n2, n5, n66, n77
- T-Mobile: n41, n71
- Other: n1, n3, n28, n78, n79
Cellular Modem
- Chipset: Qualcomm Snapdragon X55 (Sierra Wireless EM9191)
- MIMO Support: 4x4 with external antennas
- LTE-A Carrier Aggregation: At least 5x Download, 3x Upload.
- LTE Performance Category: Cat 20
- Max Theoretical Speeds:
- 5G: 4 Gbps Download, 700 Mbps Upload
- LTE: 2 Gbps Download, 150 Mbps Upload
Wi-Fi
- Wi-fi Version: Wifi 6
- Wifi Standards: 802.11 b/g/n/ax (2.4 GHz); 802.11a/n/ac/ax (5.0 GHz)
- Bands: Simultaneous Dual-Band (2.4GHz / 5GHz)
Ports
- Cellular Antenna Ports: 4x SMA-Female
- WiFi Antenna Port: 2x RP-SMA-Female
- GPS Antenna Port: 1x SMA-Female
- SIM Ports: 2x SIM (1x Redundant SIM Slot)
- Other Ports: 2x LAN, 1x WAN
Other
- Power: AC power only (no battery)
- Outdoor Rated?: No
Other Helpful Resources
A helpful video by Mobile Internet Resource Center
Peplink's product page info for the MAX BR1 Pro
Documentation
About the authors
 Afif Chamas
Afif is a Customer Support Coordinator at Waveform, who also handles technical research and content writing. He bridges the gap between customer needs and accurate documentation for cellular connectivity products. Whether he's detailing the passive nature of MIMO antennas or breaking down complex specs, Afif focuses on clear, practical information. He ensures users have exactly the details they need to get their network hardware running smoothly without unnecessary jargon.
About Waveform
At Waveform we help enable reliable cellular connectivity, everywhere. Trusted by thousands of consumers as well as NASA, Tesla, Stanford, and more. Learn more about Waveform
Suggested articles
See All Guides
Peplink MAX BR2 External Antenna Guide
By Triona Giblin · 3 min read
TravlFi XTR Pro 5G External Antenna Guide
By Triona Giblin · 2 min read
Peplink Balance 20X External Antenna Guide
By Austin Rutten · 11 min read