


TravlFi JourneyXTR 4G External Antenna Guide
Why you can trust Waveform
Waveform is the leading provider of solutions for improving cellular signal and connectivity. Our team of experts has decades of combined experience in wireless communication and remains committed to providing honest, data-driven reviews and recommendations. We rigorously test every product we sell and maintain complete editorial independence. No company can pay to influence our reviews or product ratings.
Read more about Waveform
Looking to get the best possible data rates from your TravlFi JourneyXTR?
You’ll want to purchase and connect external MIMO antennas to the device’s two 4G ports and four WiFi ports.
In this guide, we'll:
- Recommend the best external antenna to use.
- Show where the ports are located.
- Explain how to aim the antenna for best results.
The Best External Antenna For the TravlFi JourneyXTR 4G
Using a MIMO antenna outside your building, pointed at the nearest tower, can help you get the fastest LTE data rates possible.
The TravlFi JourneyXTR has two ports for cellular on the front, which allow for a 2x2 MIMO antenna to be connected to the device. It also has four WiFi ports on the back.
We recommend the following MIMO antenna option for use with the TravlFi JourneyXTR 4G:

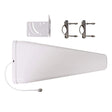
Waveform OmniRoam: 7-in-1 Low-Profile Mobile Antenna (4G/5G, 4x4 WiFi & GPS)
High-performance, omnidirectional all-in-one mobile antenna.
There are multiple versions of the OmniRoam. Make sure you choose the 7-in-1 version with two cellular antennas and four WiFi antennas, as that is the only one that can boost all six TravlFi JourneyXTR ports.
The 7-in-1 also includes a GPS antenna which you will not need when boosting the TravlFi JourneyXTR.
Why External Antennas Are Critical for Improving Data Rates
Most people think that external antennas primarily help you increase your data rates by increasing the signal strength. But that's not the case.
An increase in signal strength is often less important than other ways that external mobile antennas help.
Here are the three main ways that mobile antennas help you increase your data rates on the move:
-
They Improve Signal Quality
Vehicle antennas improve SINR (Signal to Interference plus Noise Ratio), allowing higher data rates through better modulation schemes. Proper mounting and positioning on your vehicle is crucial for optimal performance.
-
They Allow You To Connect On More Bands
Modern vehicle routers can use multiple cellular bands simultaneously through carrier aggregation. External antennas help access higher frequency bands that typically can't penetrate vehicle bodies, often providing faster, less congested connections.
-
MIMO Isolation
Vehicle-mounted antennas provide better MIMO (Multiple Input Multiple Output) isolation than internal antennas, enabling cleaner simultaneous data streams. This results in higher bandwidth and more stable connections while driving.
Installing the OmniRoam
We've compiled a detailed instruction manual to accompany the OmniRoam, where we go into depth on the best ways to install the kit.
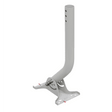
The OmniRoam has three different mounting options:
- Magnetic
- Adhesive
- Spigot

Choose the positioning that best suits your vehicle's needs. As well as in the manual, you can also find a detailed description of each mounting option in the product video:
Once you're happy with your install, it's time to connect the TravlFi JourneyXTR!

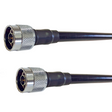
Disconnect the standard paddle antennas, and connect the external MIMO antennas to your TravlFi JourneyXTR via the cellular ports labeled in the image above. Then, connect the four WiFi antennas to the WiFi ports port.
The cellular cables are purple and the WiFi cables are white. You can connect them in any order. The OmniRoam 7-in-1 also offers a GPS antenna, which has a blue connector - you won't need to use that to boost your TravlFi JourneyXTR.
The order in which you connect the cables to the router doesn’t matter.
Once everything is connected, you're ready to enjoy reliable connectivity on the road!
About the authors
About Waveform
At Waveform we help enable reliable cellular connectivity, everywhere. Trusted by thousands of consumers as well as NASA, Tesla, Stanford, and more. Learn more about Waveform
Suggested articles
See All Guides

Inseego Wavemaker 5G FX2000 Optimization Guide
By Austin Rutten · 7 min read